Do you teach in your own classroom? Do you have the freedom to organize your classroom the way you want? If so, I highly recommend implementing flexible seating into your space! Flexible seating in middle-school is the way to go!
In this post (a break from my regular French Immersion teacher programming), I will give you a general overview of how I implemented flexible seating into my Gr 8-9 classroom. Yeah, that’s right! Grade 8-9! Flexible seating isn’t just for elementary school students.
If you are already ready to take this on, grab my FREE teacher guide here to help you along the way!
In the following weeks I will go into more detail regarding how to find furniture and what kind of furniture was preferred by my students. After that I will give some ideas on how to write a flexible seating classroom contract with your students. Make sure you check back to not miss out!

So let’s start with the basics.
Ask the students!
I started off by asking my students if they would be interested in having flexible seating in the classroom. I created a quick GoogleForm where I asked about their workspace preferences. If you are interested in the GoogleForm, I can send it to you via email. If you use this form, PLEASE make a copy of it first!
Grab the GoogleForm here:
Get approval!
After gathering some information, I approached my administration to get the green light before moving forward. I presented them with my reasoning behind wanting to move towards flexible seating, discussed the PD I attended related to flexible seating with older students, and showed them some of the research I had done.
And I got approved!
Honestly, my admin at the time was a firm believer that teachers are professionals and should be given the freedom to express themselves and have autonomy in our classrooms, so it wasn’t a hard sell.
Start searching!
I live in Canada where Donors Choose isn’t an option so I had to be creative with how I got my furniture. If you live in the US, I strongly recommend putting together a Donors Choose account with your wishlist.
If you don’t live in the US, you’ll likely have to get creative. Start asking friends/family/colleagues for extra stuff, etc. I’ll go more into detail regarding how to find furniture in my next post

Design, Design, Design!
As you are collecting furniture, make sure that you are keeping track of what you have and how many seats you’ll need. I need space for 35 students so I need to be smart about what I’m collecting. Individual seating is nice but I can’t have flexible individual seating for 35.
As I collected, I drew out mock classroom plans to see how I would organize everything. I made sure that I had spaces for individual work, as well as spaces for group work. I also made sure that I had traditional hard surfaces for kiddos who felt they needed it. As you are collecting, make sure you do the same to prepare for your classroom set-up.
Now, when I first did this it was “pre-Covid” times so I didn’t have to be careful about materials and such, which may cause another layer of complexity, depending on your district regulations.
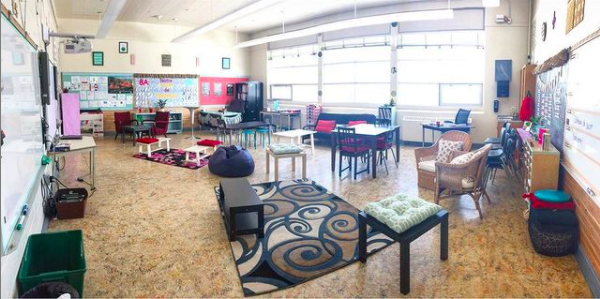
Set It Up!
Now that you have all your furniture, it’s time to set it all up. Although you’ve drawn out some set-up ideas in the previous stage, once you actually get the furniture into your room things will be a little different (unless you did your mock-up to scale!).
I suggest you get all the furniture into your room all at once and start moving things around. Decide what kind of spaces you want, how many group spaces vs. how many individual spaces, etc.
I also recommend that you try at least 3 different set-ups before you commit to one. And don’t forget, you can choose one and try it out for a week and if it doesn’t work then you can switch things up again. This seating is flexible!
Check back next week to learn all about where to find your furniture and what to look for! Remember, flexible seating in middle school is a great choice to make.
Feeling a little overwhelmed? I have created a quick step-by-step guide for you to print and follow to help you with the process. Join here and I’ll email it to you right away!
P.S. Have you ever been interesting in starting a blog? If so, check out this amazing article all about how to get started: 7 Helpful Tips on How to Blog Like a Boss.
Also, if you are looking for other Back-To-School tips, check out these blog posts:
Procedure and Routines in the Classroom
9 Fun and Effective Ways to Build Classroom Community
Build Powerful Student Relationships
Would You Rather For Kids
6 Important Considerations for Back-To-School in First Nations Schools